Asma QuickStart guide: Say hi to AWS Serverless Developer Portal

In this post I will explain how to deploy AWS Serverless Develoer Portal only, so have fun :)
I highly recommend you to read my post about AWS CloudFormation first, here
What is Serverless Developer Portal?
It is an open-source application to make your APIs available to others. It works with your API gateway. I think if it as front-door of your house.
Note: I will call serverless developer portal as SDP for short
Deployment:
You have two options to deploy SDP, which are:
- AWS Serverless Application Repository
- Download the source code from AWS GitHub and deploy it using AWS CLI/ SAM CLI
Before exploring two options in detail, I want to cover some of SDP settings, in other words, SDP stack parameters.
SDP Settings:
We have 12 settings/parameters, only 3 of them are required, we can deploy stack with the default value for the rest.
Note: you can change those settings after deployment, through CloudFormation stack page
- ArtifactsS3BucketName [required]: CloudFormation will auto-generate private S3 bucket to store metadata. You must follow S3 bucket names rules otherwise, you will have a lot of confusing errors
- CognitoDomainNameOrPrefix [required]: you can put any name here, it will be used with Cognito UI for sing-up and sing-in page, for example, I put “asma” as value, the start of URL for sing-up and the sing-in page would be like this https://asma.auth.us-east-1.amazoncognito.com/login?
- CognitoIdentityPoolName [optional]: CloudFormation will create Cognito identity pool, default name is DevPortalIdentityPool
- CustomDomainNameAcmCertArn [optional]: if you will use a domain name with an ACM certificate, you should provide ACM certificate ARN. If you leave it empty, SDP will be generated without a custom domain name
- DevPortalAdminEmail [optional]: if you put an email address here, SDP will show “Got an opinion? button for customers to send their feedback
- DevPortalFeedbackTableName [optional]: if we want to use DevPortalAdminEmail to receive feedback, CloudFormation will create for us DynamoDB table to store feedback. The default table name is -if we provide an email address- is DevPortalFeedback
- DevPortalCustomersTableName [optional]: CloudFormation will create for us DynamoDB table to store customer accounts. The default table name is DevPortalCustomers
- DevPortalSiteS3BucketName [required]: CloudFormation will auto-generate private S3 bucket to store web application code. You must follow S3 bucket names rules otherwise, you will have a lot of confusing errors
- MarketplaceSubscriptionTopicProductCode [optional]: useless unless we want to use AWS marketplace integration
- StaticAssetRebuildMode [optional]: it’s dangerous, so don’t touch it :) go with the default and you will be fine!
- StaticAssetRebuildToken [optional]: if you want to rebuild SDP site static assets, use can use a timestamp
- UseRoute53Nameservers [optional]: when we set it to true, that means we will provide our own name server hosting. The default value is false
you must check S3 Bucket naming rules here
That was looong and boring, now back to the fun part!
First option: AWS Serverless Application Repository
You can have your SDP up and running in no time with only two clicks! BUT, this way you will not be able to either customize the UI of SDP or functions if you want.
1- go to api-gateway-dev-portal page in AWS repository here
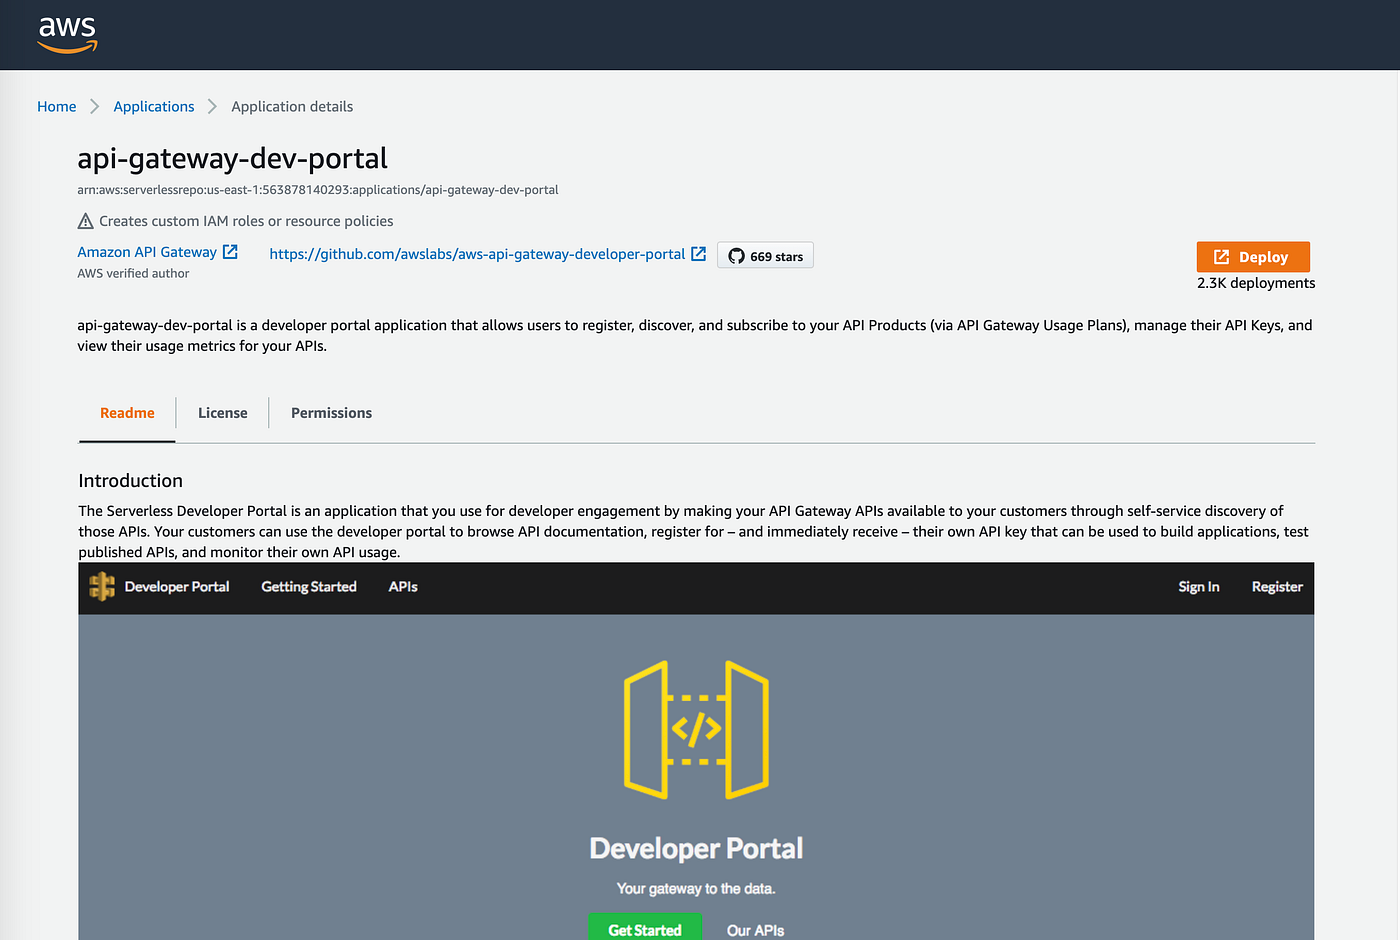
2- click on Deploy button
3- it will redirect you to your AWS account to log in, so log-in
4- lambda function page will be open with details for our api-gatewat-dev-portal as shown below

5- you can check template, permission, and stack information from this page and most importantly we will configure SDP settings here! in the Application settings section, so go down a little bit
6- Now we need to fill in the required settings as shown below
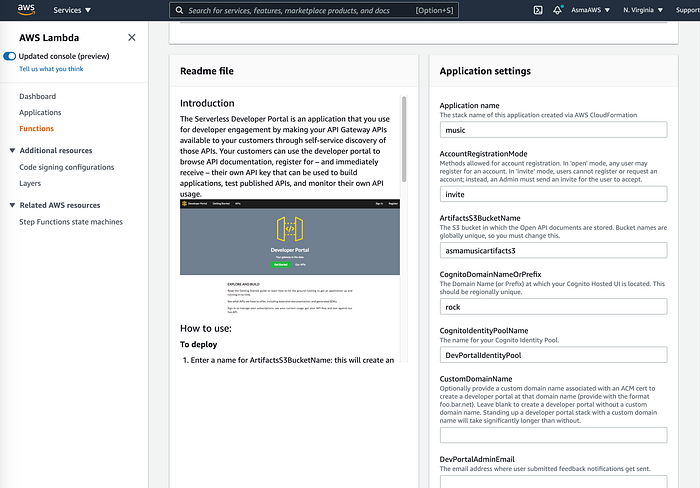
- Application name: is the stack name, and keep it short, otherwise, you will run into a strange error! so remember KEEP IT SHOOORT
- AccountRegistrationMode: you can either use “open” or “invite” mode, I prefer the latter as I don’t want anyone to have access to SDP
- ArtifactsS3BucketName: I explained it above, here I entered “asmamusicartifacts3”
- CognitoDomainNameOrPrefix: I explained it above, here I entered “rock”
- DevPortalSiteS3BucketName: I explained it above, here I entered “asmadev2”
7- check “I acknowledge that this app creates custom IAM roles and resource policies.”
8- click on Deploy button
9- WAIT and WAIT
now CloudFormation will do its magic and will spin-off everything for us. You can check deployment status from the CloudFormation page.
Second option: Download the source from AWS GitHub and deploy it using AWS CLI/ SAM CLI
You need to deploy manually it may be a little bit chaotic at first, BUT you can fully customize UI and functions if you want.
What is SAM?
SAM is framework from AWS team, I like to think about it as sugarcoatd AWS CLI for CloudFormation. It uses CloudFormation template but with little bit different I will not cover it here as it’s not in the scope of the post :)
prerequisites:
- AWS CLI installed
- SAM CLI installed
- private S3 bucket to upload zipped Lambda functions and AWS SAM template
- configure your AWS CLI by running
aws configurethen enter your AWS Access Key ID and AWS Secret Access Key
Note: for this option, we will create one S3 bucket and CloudFormation will create two S3 bucket as mentioned in SDP settings
1- go to AWS GitHub and clone aws-api-gateway-developer-portal to your local machine
git clone https://github.com/awslabs/aws-api-gateway-developer-portal.git2- go to project root folder
3- run below command. Don’t forgot to replace YOUR_BUCKET_NAME with your actual s3 bucket name :)
sam package --template-file ./cloudformation/template.yaml \
    --output-template-file ./cloudformation/packaged.yaml \
    --s3-bucket YOUR_BUCKET_NAME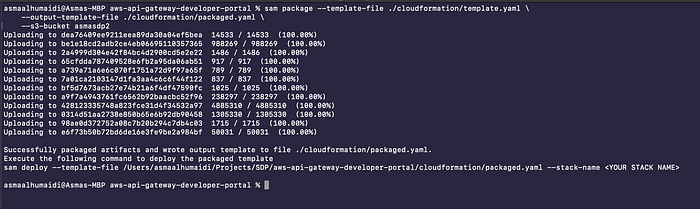
sam package will upload your zipped Lambda functions to your S3 bucket
Any sam deployment consists of 3 steps, sam build, sam package, then sam deploy. If you make any change to source code, you need to run sam build first
4- deploy template by running
sam deploy --template-file ./cloudformation/packaged.yaml \
    --s3-bucket YOUR_BUCKET_NAME \
    --stack-name "YOUR_STACK_NAME" \
    --capabilities CAPABILITY_NAMED_IAM \
--parameter-overrides CognitoDomainNameOrPrefix="YOUR_COGNITO_DOMAIN_NAME_OR_PREFIX" DevPortalSiteS3BucketName="YOUR_S3_BUCKET_NAME_FOR_DEV_PORTAL" ArtifactsS3BucketName="YOUR_S3_BUCKET_NAME_FOR_ARTIFACTS"- YOUR_BUCKET_NAME: name of your S3 bucket that you used to upload zipped Lambda functionsto, now we will use it again to upload sam template
- YOUR_STACK_NAME: you can name your stack/application anything but remember to keep it SHORT and this time follow S3 bucket name rules because we will use it for naming two S3 buckets
- capabilities CAPABILITY_NAMED_IAM: remember checkbox for agreement in first option? yeah it this :)
- parameter-overrides: we will set the 3 reuiried SDP settings here, DevPortalSiteS3BucketName, CognitoDomainNameOrPrefix and ArtifactsS3BucketName.
Note: For DevPortalSiteS3BucketName and ArtifactsS3BucketName both of their name should start with YOUR_STACK_NAME-S3BucketName
my command will be like this
sam deploy --template-file ./cloudformation/packaged.yaml \
    --s3-bucket asmasdp2 \
    --stack-name "asma2rock-dev-portal" \
    --capabilities CAPABILITY_NAMED_IAM \
    --parameter-overrides CognitoDomainNameOrPrefix="rock2ui" DevPortalSiteS3BucketName="asma2rock-dev-portal-static-assets" ArtifactsS3BucketName="asma2rock-dev-portal-artifacts"
Note: for parameter-overrides, do not leave space before and after equal sign
your terminal will be show similar output

again, WAIT and WAIT :)
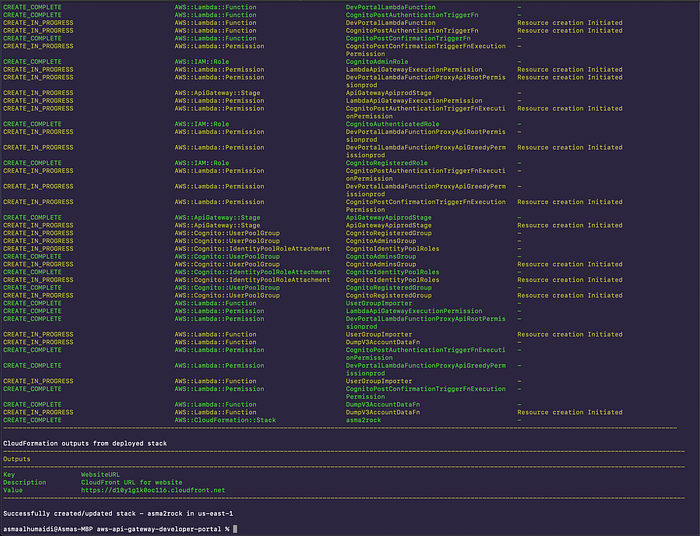
Outupt in terminal will show us URL for our developer portal.
Access Developer Portal:
You can use SDP admin section to manage your users, invite them, delete them, and check APIs scubscriptions.
After deploying SDP in either way -first option or second option- you can get URL for SDP by going to CloudFormation page, then open stack, and go to output tab

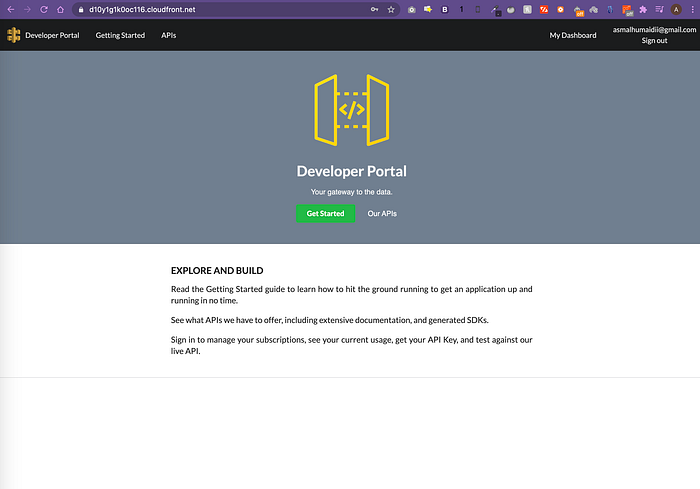
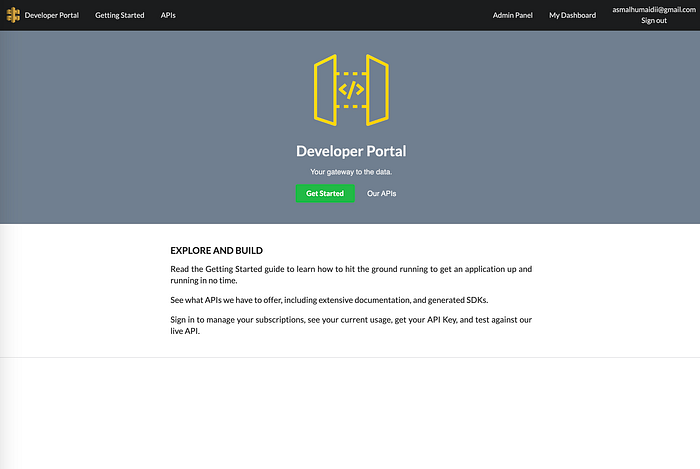
If I open https://d10y1g1k0oc116.cloudfront.net/

Create Admin User for SDP:
1- go to SDP webpage
2- click on Reigester
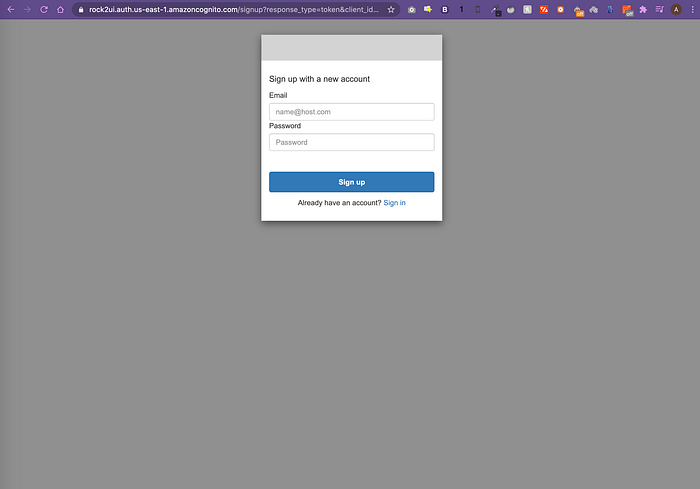
3- after reigtesrtaion, you will receive OTP in your email
4-if you successfully reigesterd, SDP will be like this
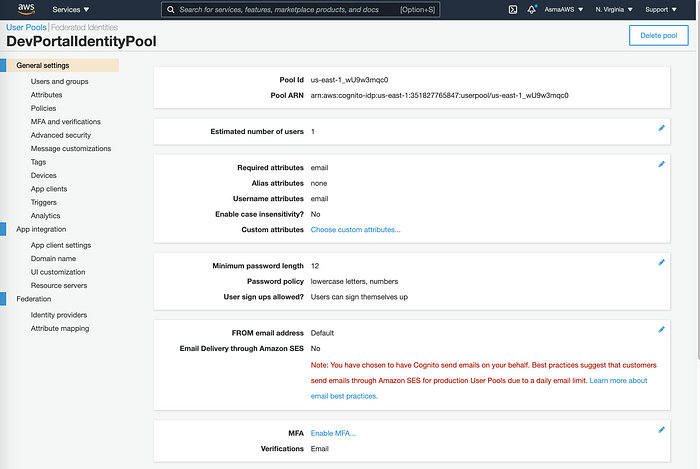
5- in your was account, go to Cognito page
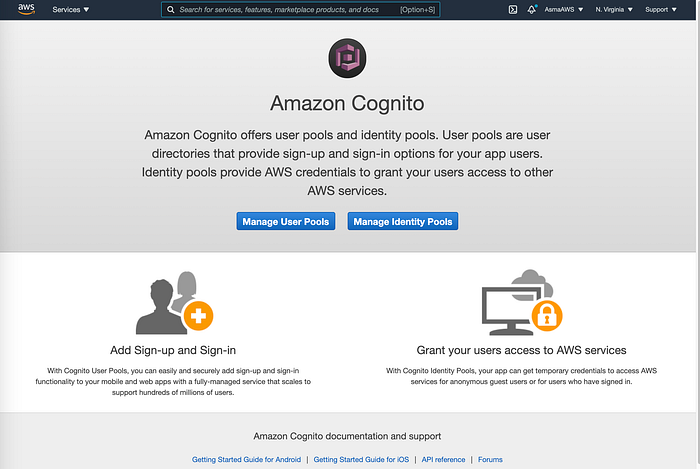
6- click on Manage User Pools button
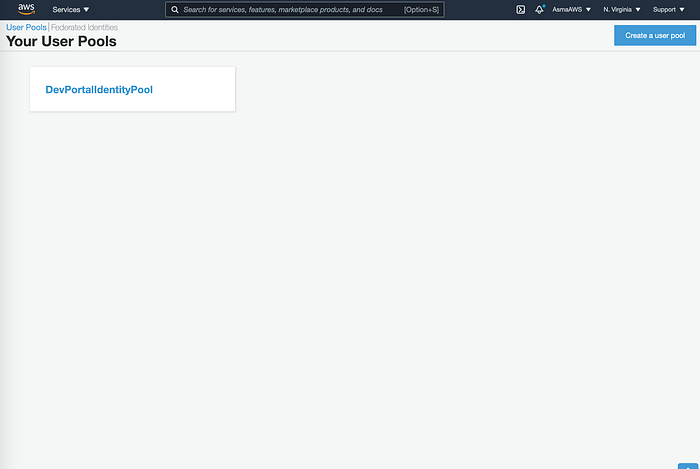
7-click on your application pool, in our case, it is DevPortalIdentityPool
8- click on Users and groups from left navigation menu
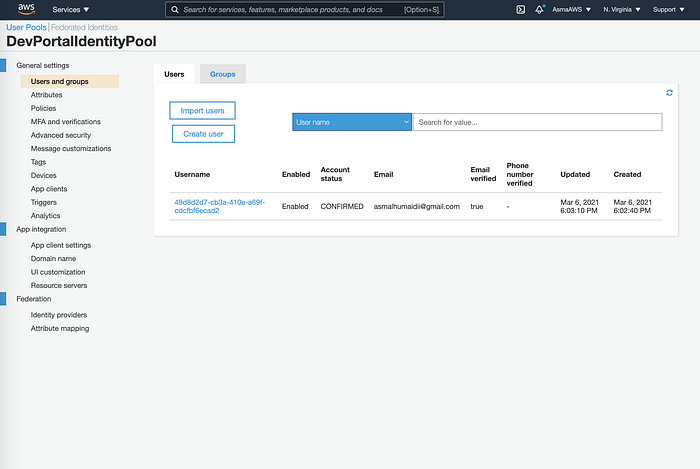
9- click on username that you want to promote to be admin, yeah we only have one right now :)
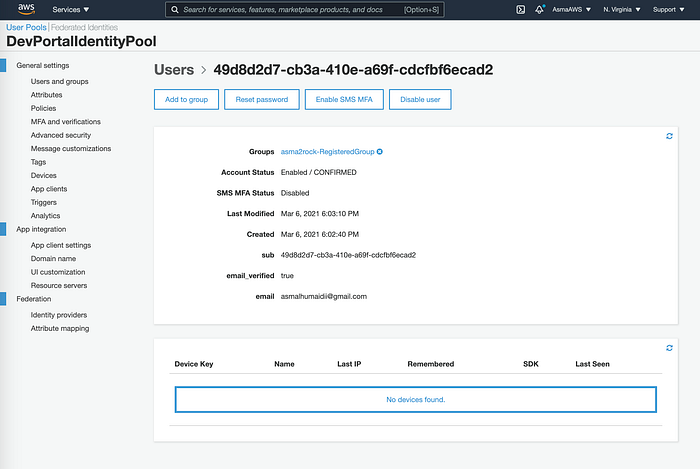
10- click on Add to group button

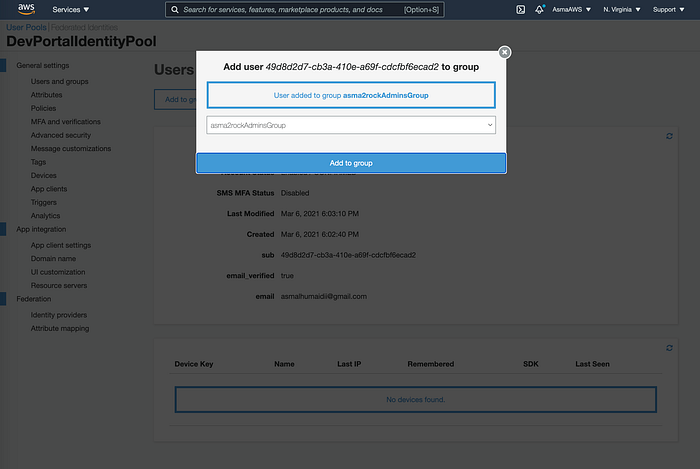
11-select admin group from drop-down list and click on Add to group button

12- go back to SDP webpage, singout then log-in, you will find extra menu in top navigation which say “Admin Portal”
It was a long long day … next time I will cover how to configure API gateway to expose endpoints in SDP 0: